Play HUD
The Play HUD is the primary interface that must be worn to initialize Obsidian and to control it afterwards. It serves as the central command hub for all device functions.
To adjust the HUD size, click the gear icon and look for the Zoom in and Zoom out buttons.
Customization HUD
If your Customization HUD shows an instruction page or loads as a plain white background, please keep reading.
Requirements
Ensure you are using Firestorm 7.1.13 or later.
Ask Firestorm Support for help if none of the steps below work.
Other viewers are reported to work well too, but we only test what we build in Firestorm.
First Steps
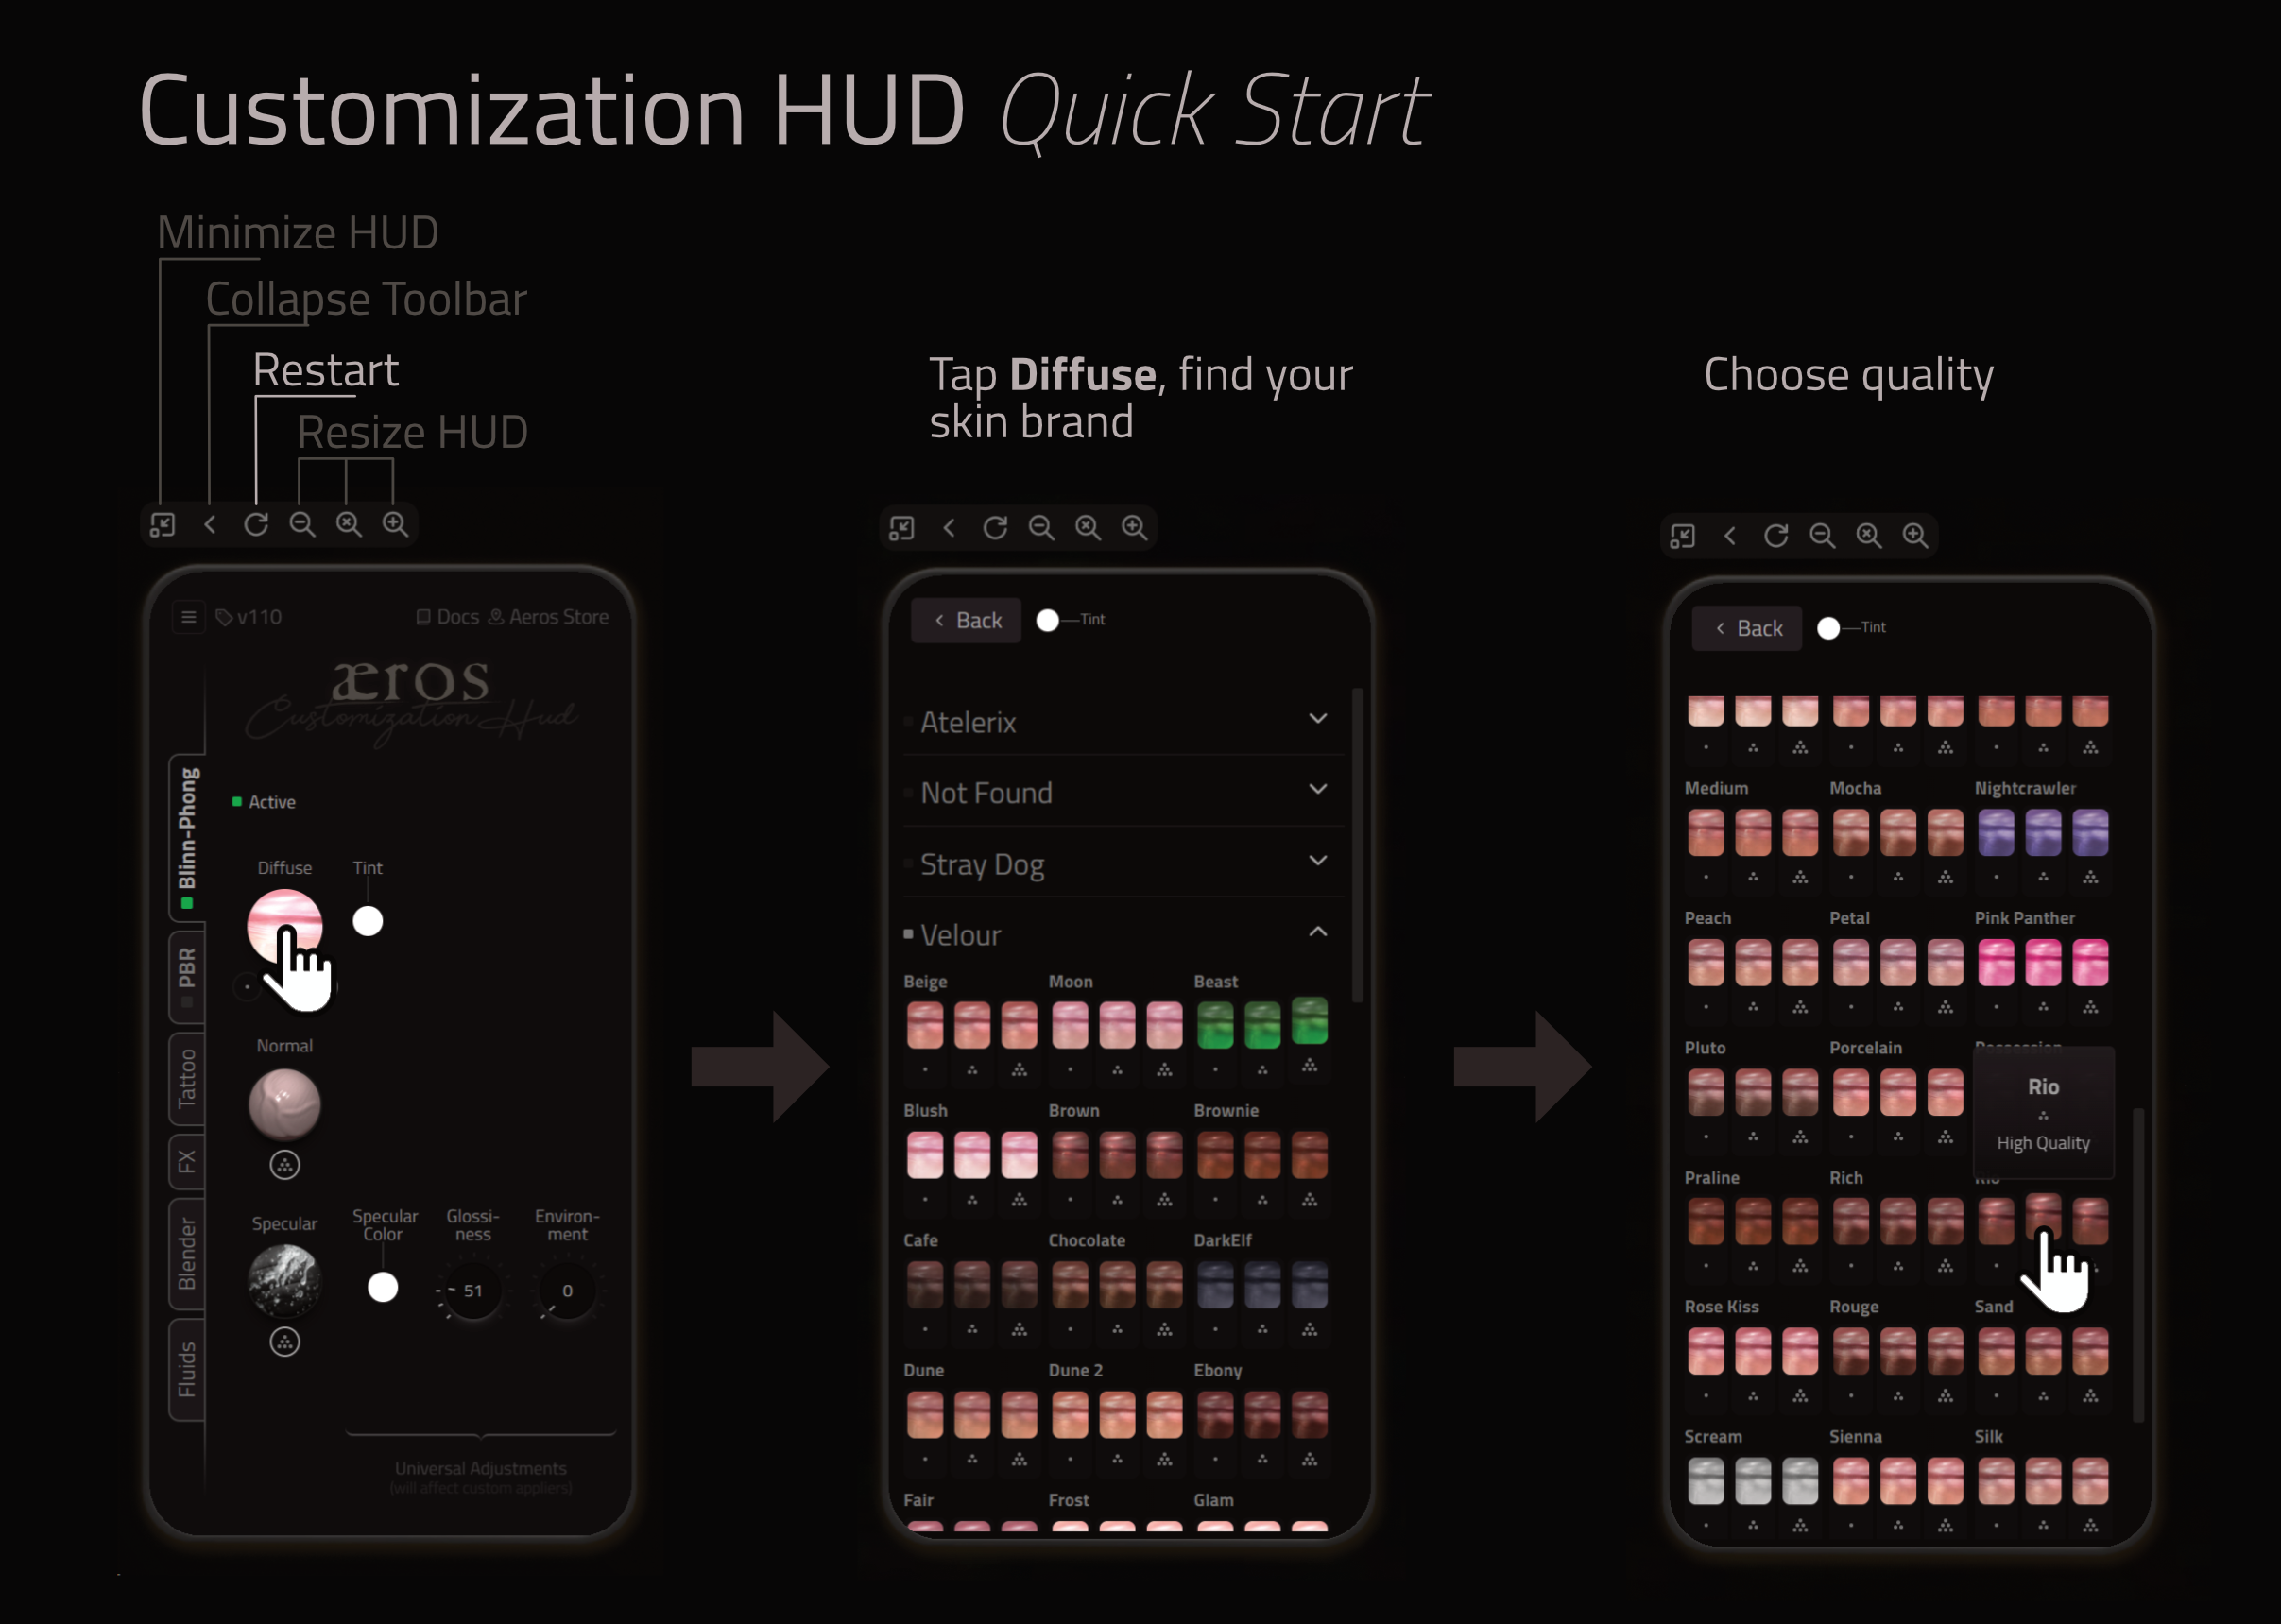
- If the Customization HUD shows an instruction page, try touching it to activate Media.
- Try reloading the Customization HUD using the reload
⟳button on its toolbar. - Try moving to a quiet region that allows scripts.
Firestorm Settings
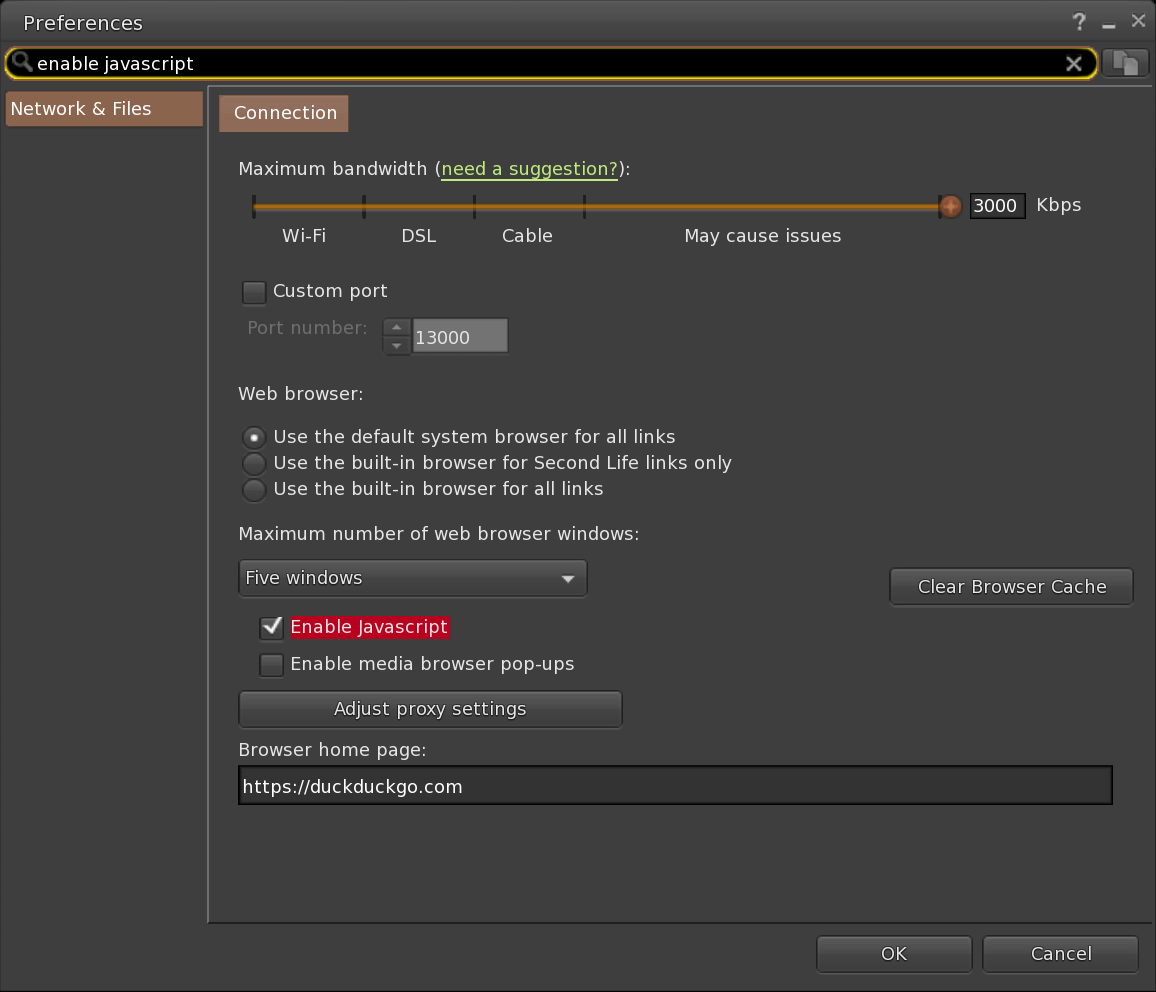
Open File > Preferences…
-
Enable JavaScript under
Network & Files|Connection| ☑Enable JavaScript.
Click to navigate to this setting in Firestorm
-
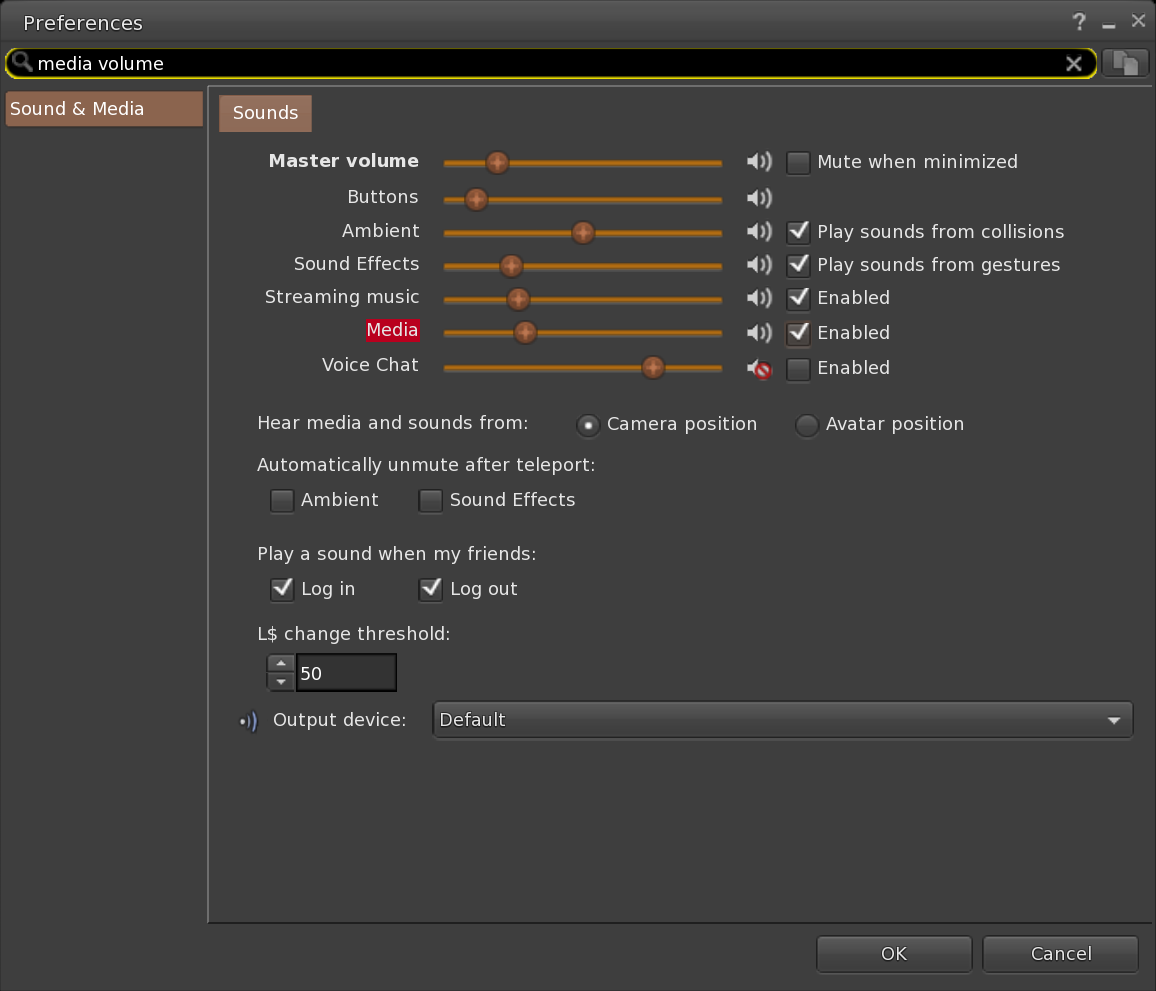
Enable Media under
Sound & Media|Sounds|Media <--(volume slider)---->☑.
Click to navigate to this setting in Firestorm
-
(Optional) Enable Media auto-play:
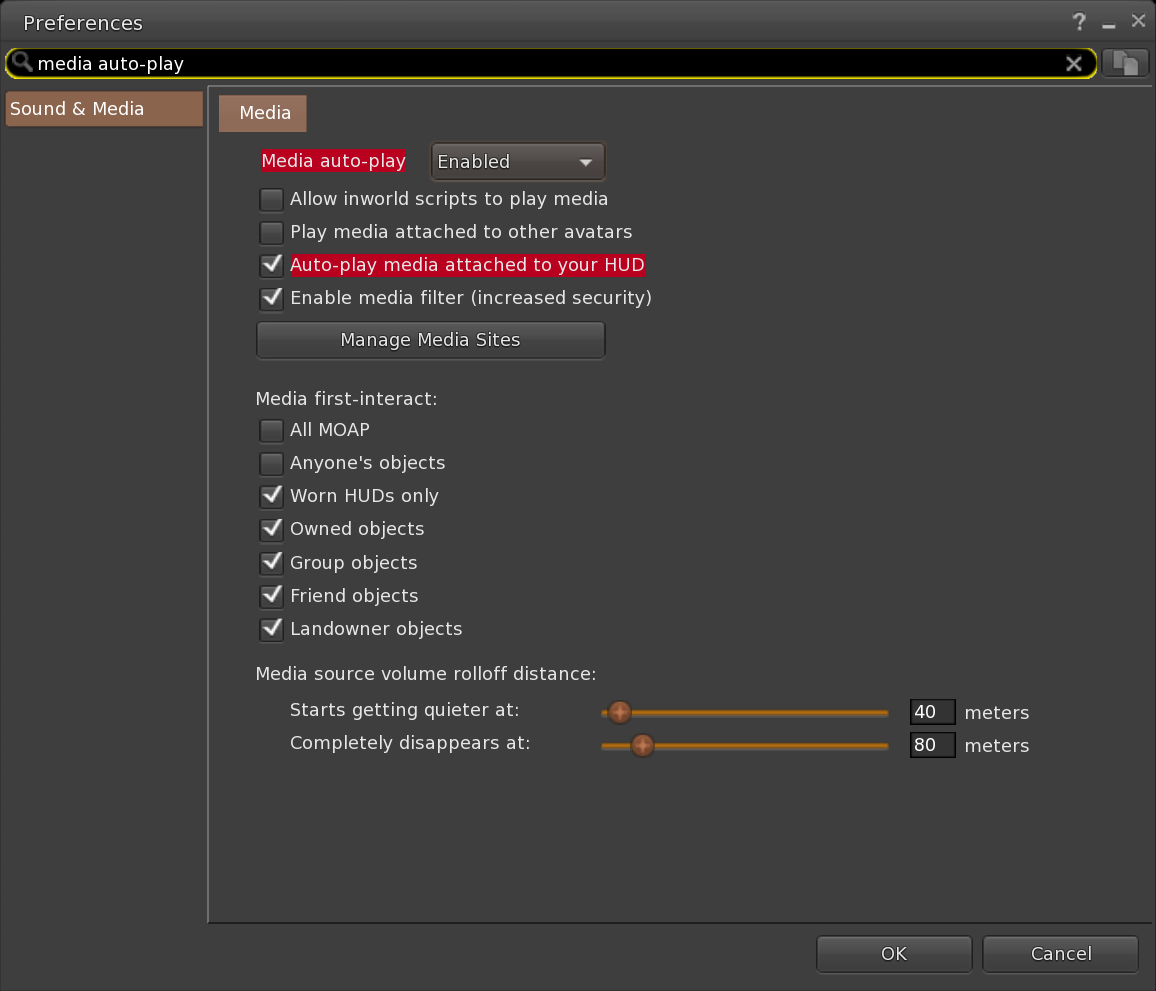
- Under
Sound & Media|Media|Media auto-playset the dropdown to Enabled. - Tick ☑
Auto-play media attached to your HUD.
Click to navigate to these two settings in Firestorm
This is a global setting that affects all media, not just the Customization HUD. If you leave it disabled, you'll need to click the surface of the Customization HUD to start the media every time you wear it.
- Under
-
(Good to have) Enable Media first-interact for worn HUDs under
Sound & Media|Media| ☑Media first-interact.
Click to navigate to this setting in Firestorm.
This removes the need for a first click to interact with media.
Still no luck?
- If your OS is Windows, make sure Firestorm is not running with Administrator privileges, as recommended by the Firestorm Support Group.
- Try fully disabling
Enable media filter— Click to navigate to this setting in Firestorm.- Alternatively, edit
Manage Media Sitesto allow meshtoolbox.com — Click to navigate to this setting in Firestorm.
- Alternatively, edit
- Click ‘Clear Browser Cache’ and restart the viewer — Click to navigate to this button in Firestorm
Customization HUD feels slow?
If your Customization HUD feels slow, try enabling “Reduce UI Motion” from the top-left menu. It also helps to lower your draw distance while customizing.
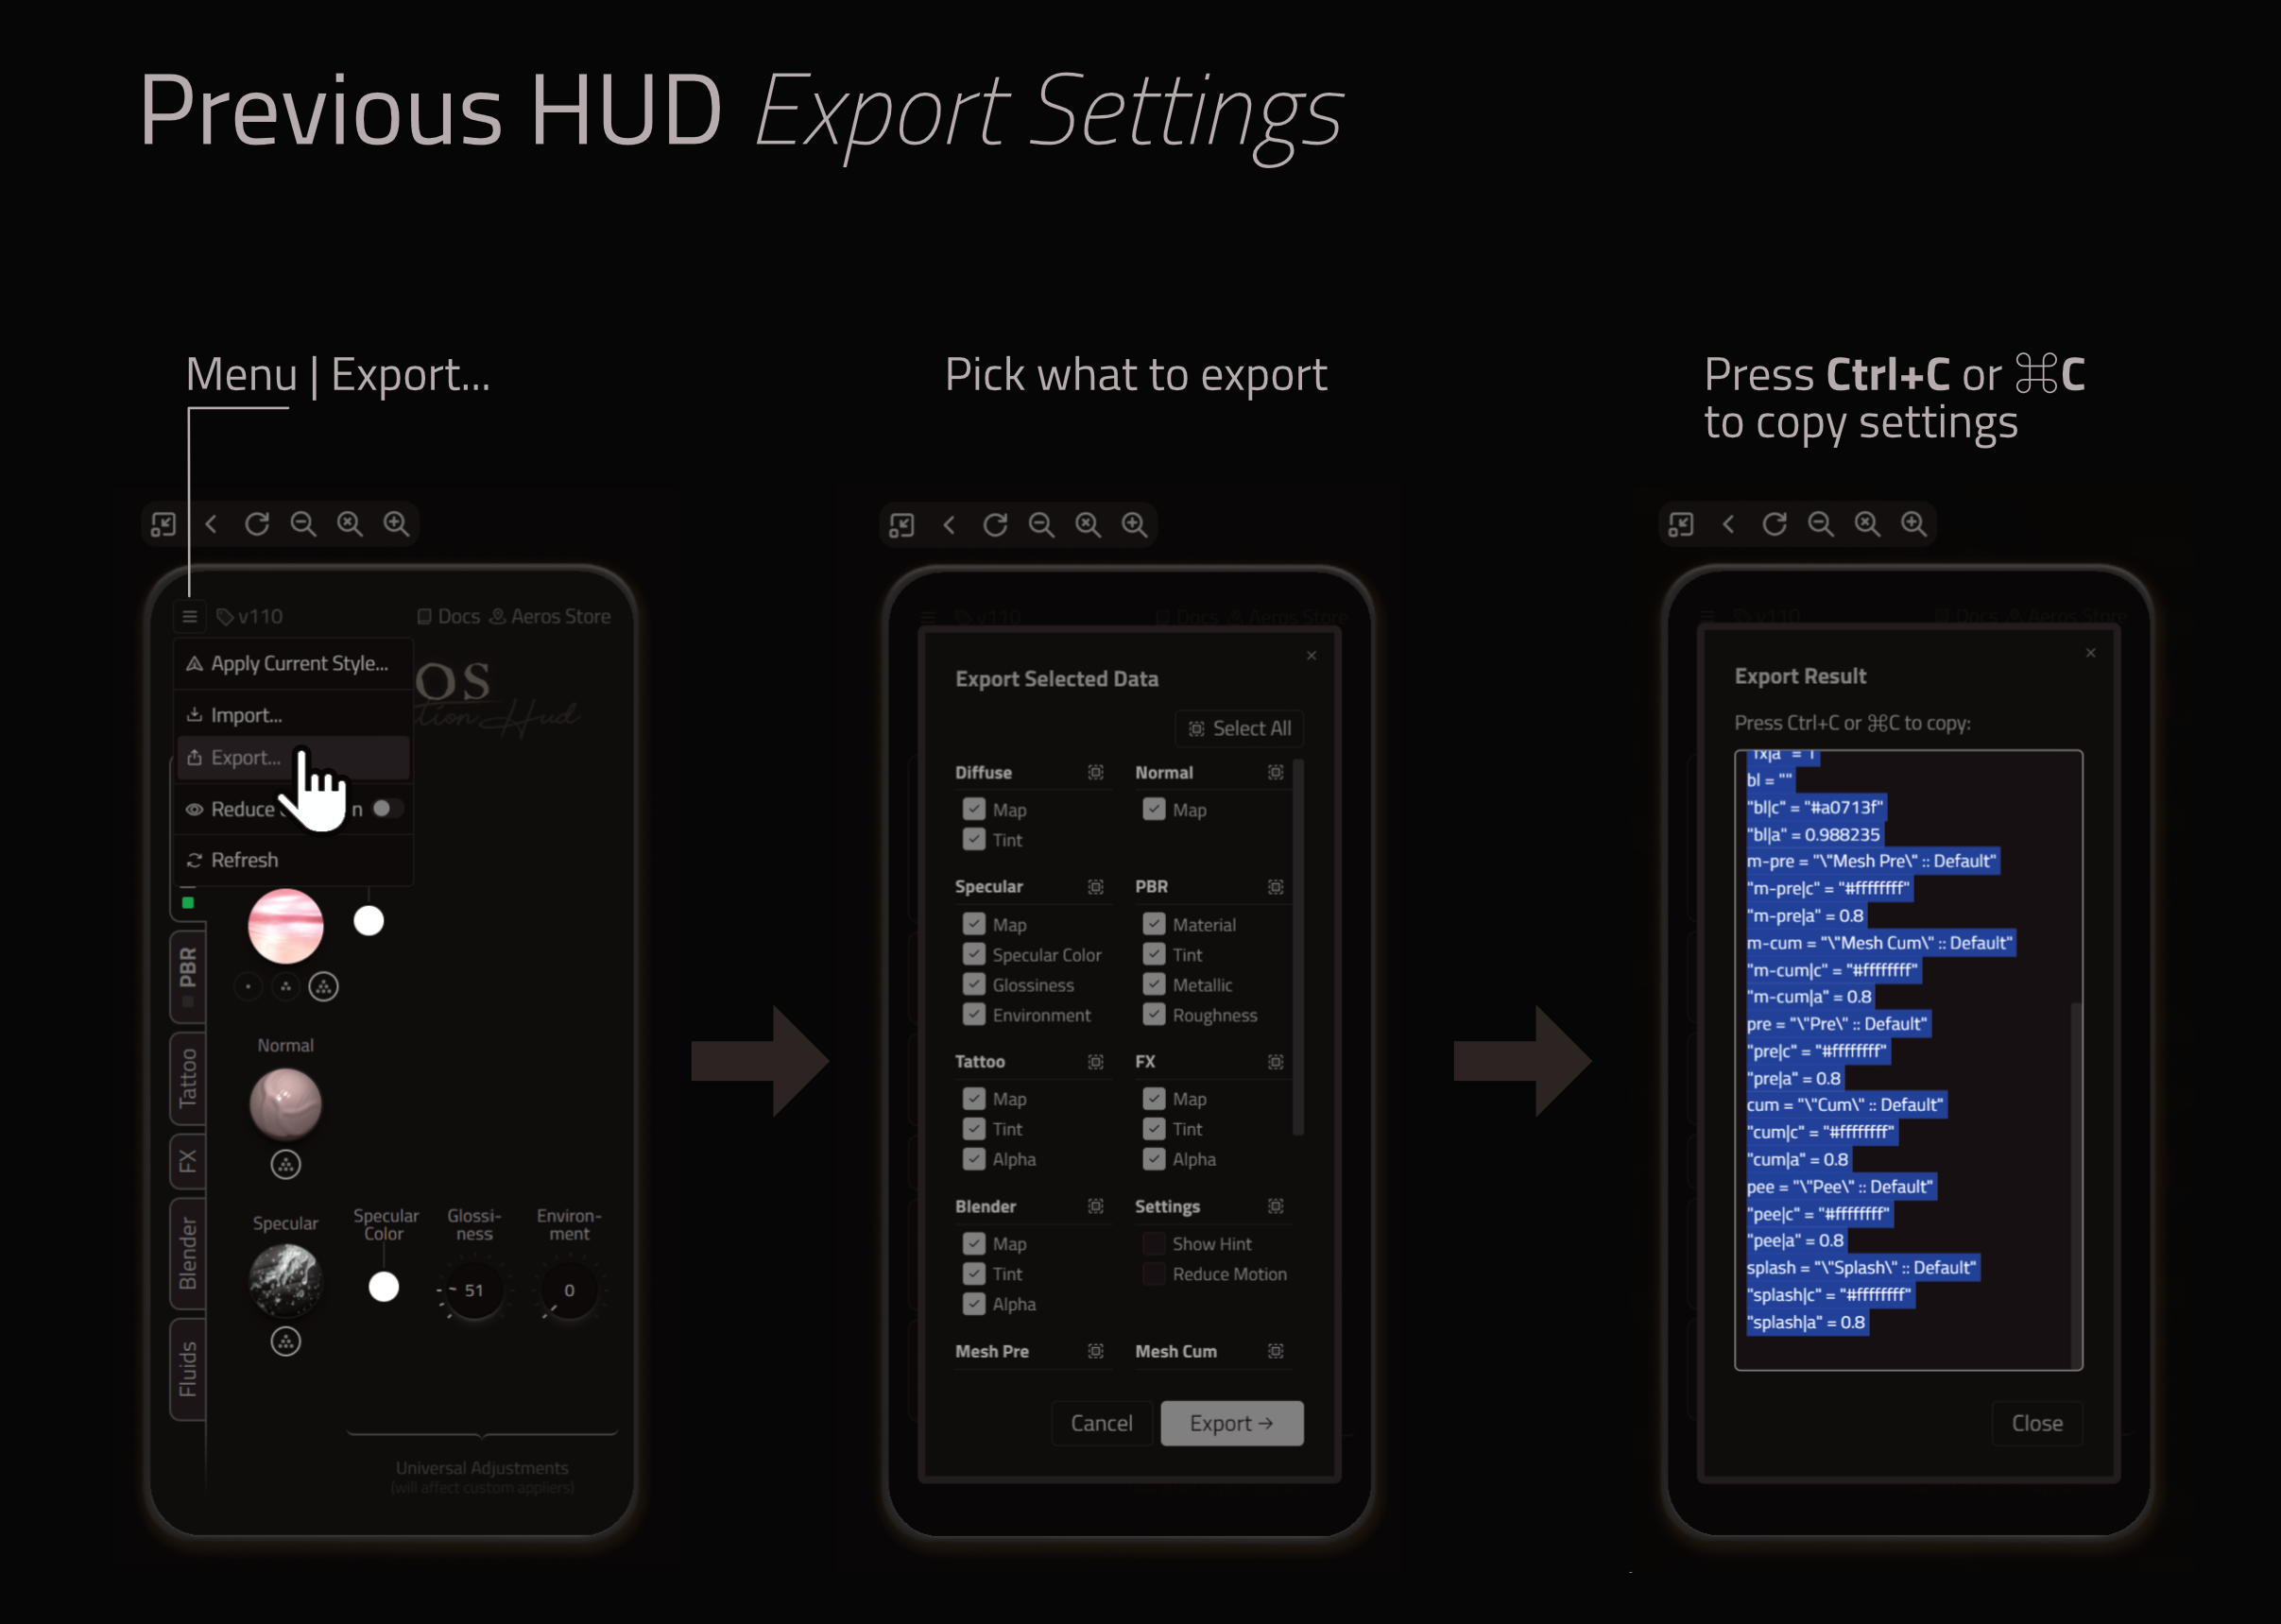
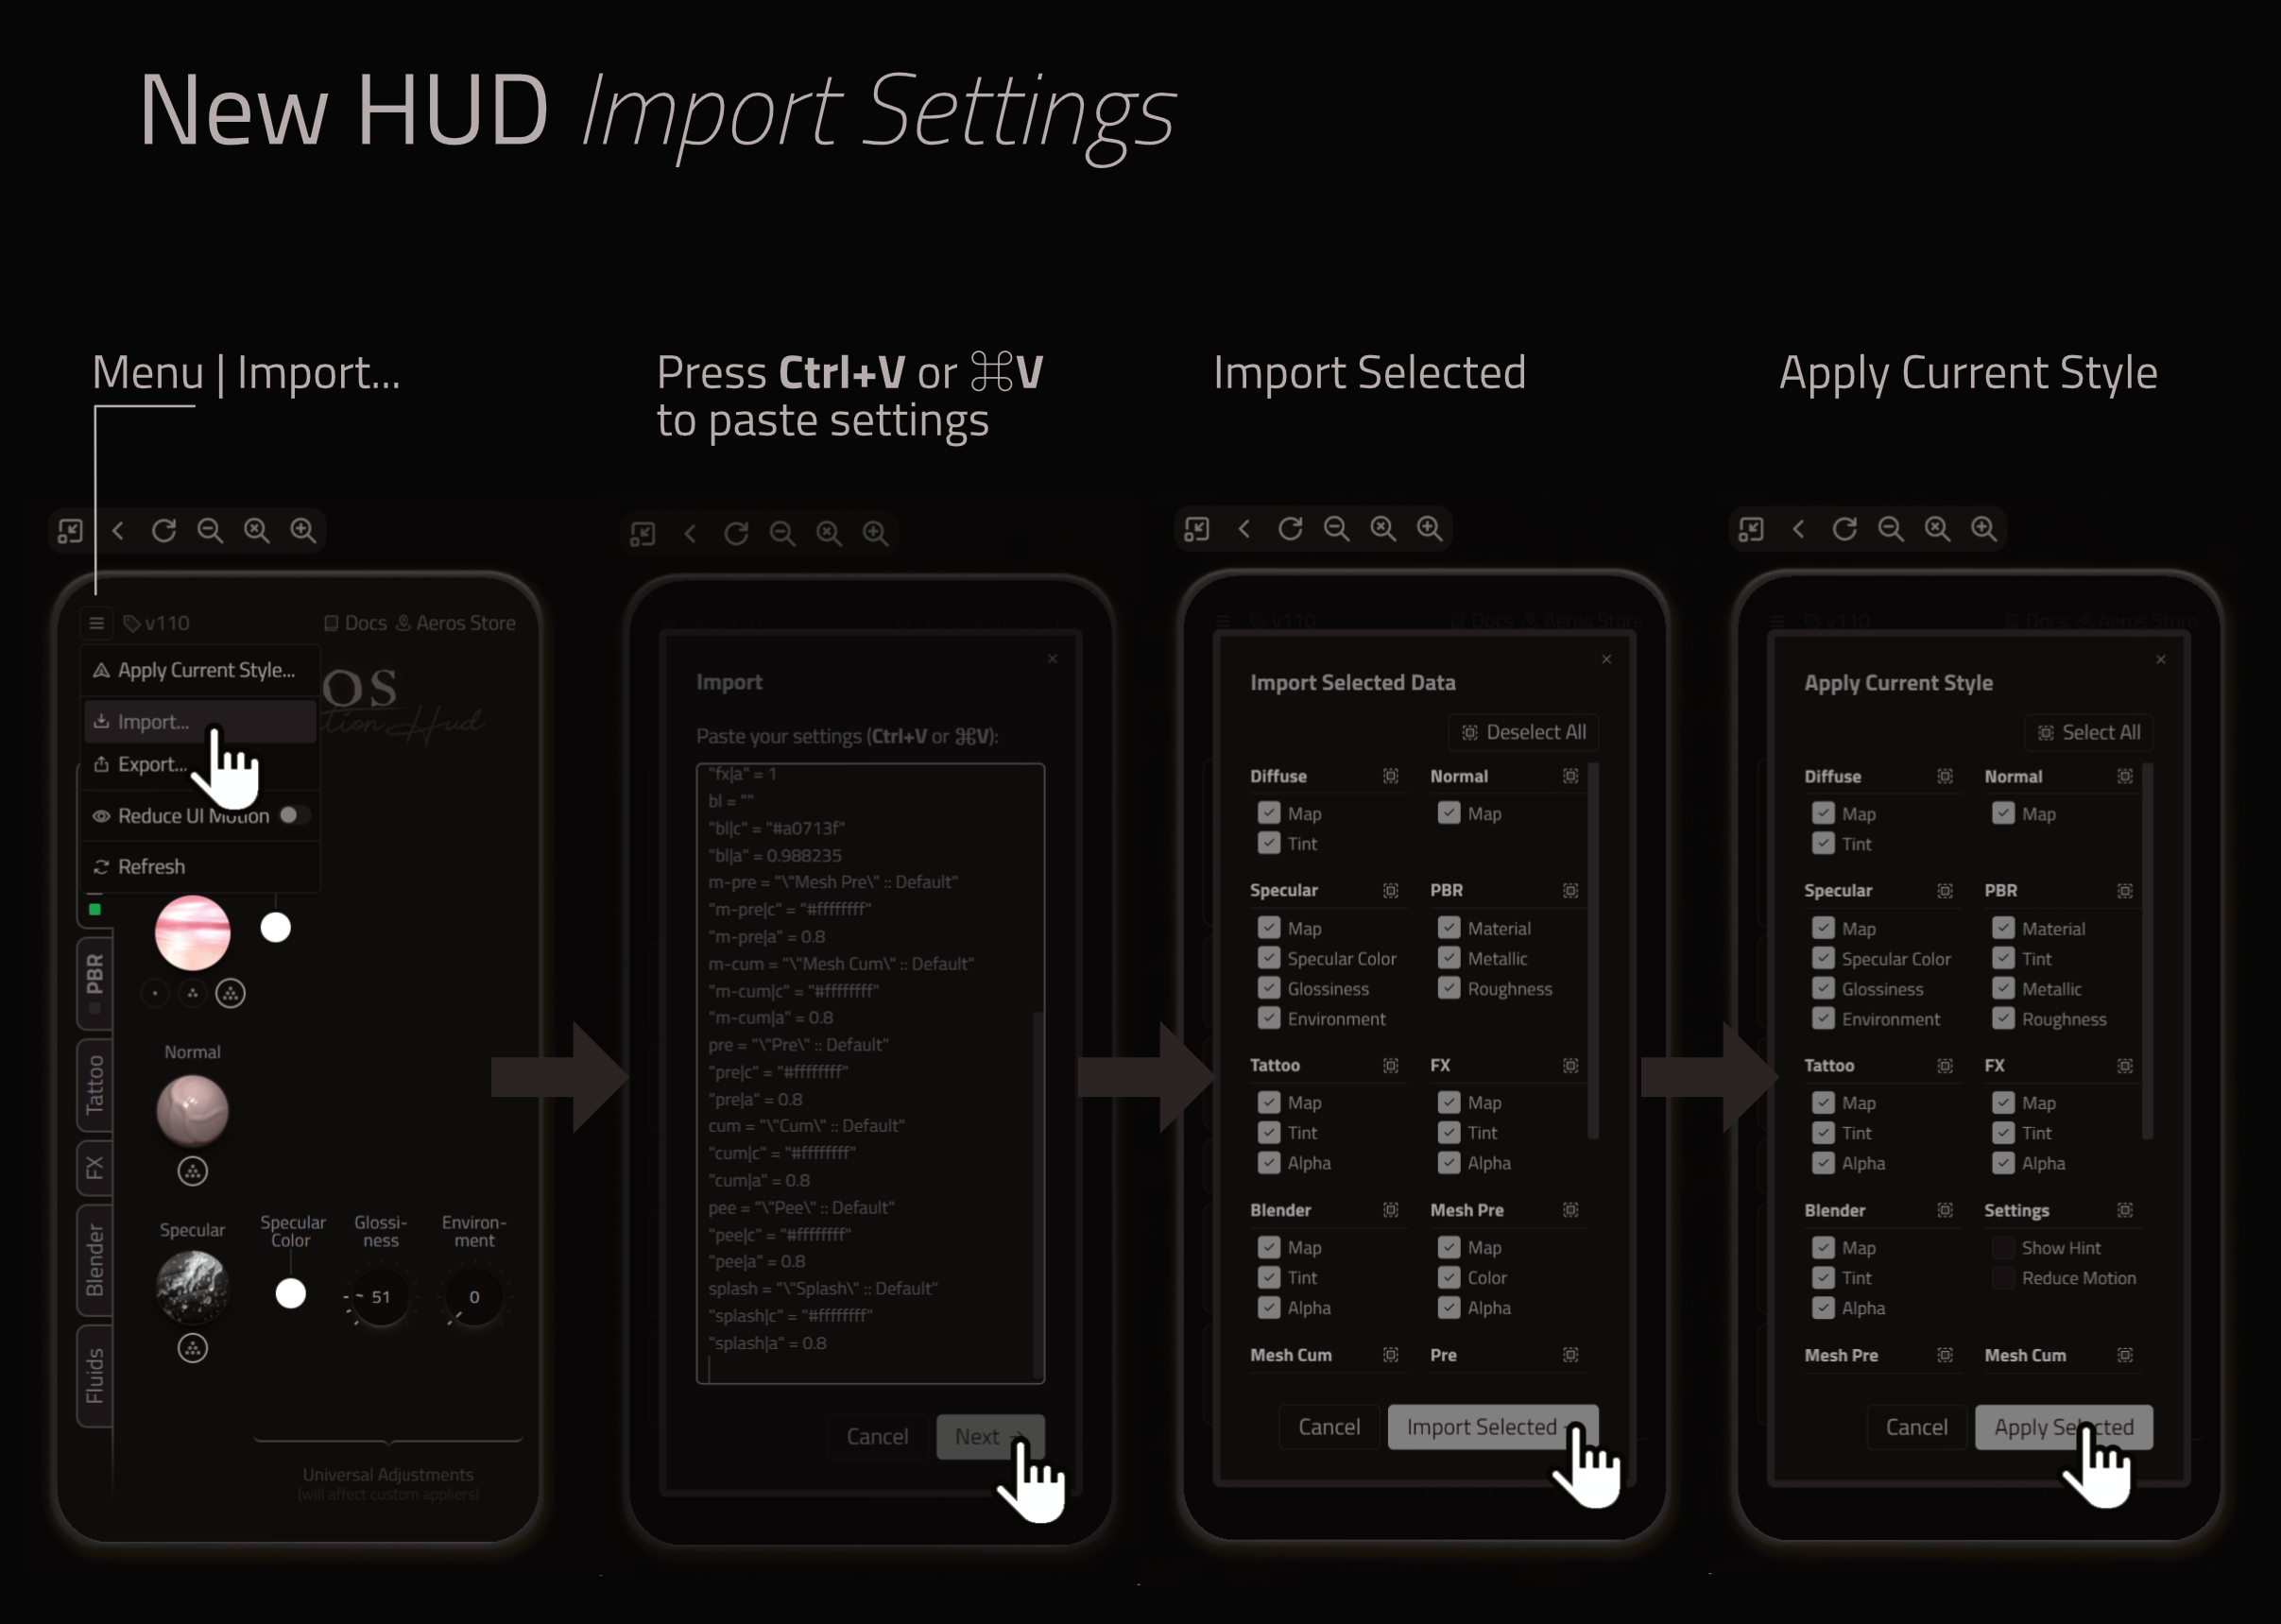
Export, Import, Apply Current Style
The Customization HUD makes it easy to Export and Import settings and to Apply Current Style. This has a variety of applications.
-
If you are reusing the same version of the Customization HUD after replacing the main Obsidian Device (for example, changing the size or unpacking from scratch):
- From the top-left menu choose Apply Current Style.
- Reapply Tattoo, FX, Blender1 and Fluids custom appliers as needed.
- From the top-left menu choose Apply Current Style.
-
If you are updating the product:
- In the old Customization HUD, use the menu to Export. Follow the prompts. Press Ctrl+C or ⌘C to copy these settings. You can save them in a notecard if you like.
- In the new Customization HUD, use the menu to Import. Press Ctrl+V or ⌘V to paste the previously exported settings.
- Follow the prompts.
- The wizard will offer to Apply Current Style as the last step.
- If you had any custom appliers for Tattoo, FX, Blender1 or Fluids, find them in your Inventory and apply again.
How Customization HUD works
- The Customization HUD loads MoaP (“Media on a prim”) and communicates with the Device to apply textures from a growing database that aims to visually match the majority of products from famous skin brands. The HUD also provides the most commonly requested tweaking settings:
- Blinn-Phong:
- Diffuse map and Tint.
- Normal map.
- Specular map and Specular Parameters (specular color, glossiness, environment).
- PBR:
- Main material.
- Modification of Tint, Metallic & Roughness Factors.
The current version of the engine allows more features to be added to the ‘Customization’ HUD without needing to replace the primitive.
- Blinn-Phong:
Obsidian does not store any user data externally. The Customization HUD stores users’ options in the HUD’s in-world memory and synchronizes them with the view every time it loads.
Beyond the Customization HUD
The open architecture of Obsidian also makes it possible to change almost any visual setting in the Blinn-Phong and PBR worlds, with the following exception:
- alpha, alpha mode and alpha mask cutoff cannot be changed on the Skin layer. However, Tattoo, FX, and Blender1 layers (referred to as
TFBlayers in the list below) can have their alpha, alpha mode and alpha mask cutoff settings modified.
These include:
- Blinn-Phong:
PRIM_TEXTURE— diffuse map, repeats, offsets, rot.PRIM_COLOR— diffuse color, alpha (onTFB2 only).PRIM_SPECULAR— specular map, repeats, offsets, rot.PRIM_NORMAL— normal map, repeats, offsets, rot.PRIM_GLOW— intensity.PRIM_ALPHA_MODE— alpha mode (onTFB2 only), mask cutoff (onTFB2 only).PRIM_FULLBRIGHT— fullbright flag.PRIM_BUMP_SHINY— shiny, bump.PRIM_TEXGEN— mode.
- PBR:
PRIM_RENDER_MATERIAL— material.PRIM_GLTF_BASE_COLOR— base color map, repeats, offsets, rot, tint color, alpha (onTFB2 only), alpha mode (onTFB2 only), alpha mask cutoff (onTFB2 only), double sided.PRIM_GLTF_NORMAL— normal map, repeats, offsets, rot.PRIM_GLTF_METALLIC_ROUGHNESS— metallic/roughness map, repeats, offsets, rot, metallic factor, roughness factor.PRIM_GLTF_EMISSIVE— emissive map, repeats, offsets, rot, tint color.
These primitive params are not implemented:
PRIM_POINT_LIGHT— not implemented.PRIM_PROJECTOR— not implemented.
Appliers
Please use updated appliers that contain scripts with versions
v110or higher. The/ readyscript should be of version110.1. That guarantees that the appliers properly remove Normal and Specular maps and parameters.
Known issue. PBR Material for the Tattoo, FX, and Blender 1 layers needs
Alphato be modified (the word "Alpha" is highlighted in brown in Firestorm). This is because the application's diffing process treats the absence of data as a signal to skip the change. Starting fromv110, the warning appears right in the popup menu as a reminder.
We recommend using Blinn-Phong for the Skin and Tattoo layers to ensure the Tattoo layer appears properly integrated with the skin.
Customization of all implemented parameters is available by means of the aeros / Ck-OBS / DEV / applier / <layerName> objects, included in the box. The mesh permissions are set to COPY|TRANS|MOD and the script permissions are set to COPY|TRANS, making it possible to distribute or sell the appliers right away. The applier script reads data from the mesh faces, encodes it, and passes it to the Device. The applier can only target a Device owned by the same user.
Since the v109 release, there are five types of appliers in the box:
aeros / Ck-OBS / DEV / applier / Skinaeros / Ck-OBS / DEV / applier / Tattooaeros / Ck-OBS / DEV / applier / FXaeros / Ck-OBS / DEV / applier / Blender
(The Blender1 applier uses onlyFace 0and targets a ring around the base, close to the body.)aeros / Ck-OBS / DEV / applier / Fluids
- The Fluids applier uses faces
0through5to target all fluids. The destination particles and mesh fluids are clearly marked on the background of the mesh.- In order to mark just one fluid type as part of the final applier, drop the
SKIP (special texture)on the rest of the fluid faces before dropping the/ readyscript into it.- The Fluids applier only takes advantage of the Diffuse map, Tint color and Alpha settings under the Blinn-Phong rendering model.
The applier’s mesh faces (except the Fluids applier) have the following roles:
| Face Number | Part(s) | Foreskin | Click Action |
|---|---|---|---|
Face 0($)(*) | Base of the shaft & Balls | (Any) (f_mode=<any>) | Send face 0 only |
Face 1(*) | Shaft front & Knob | Open (f_mode=0) | Send face 1 only |
Face 2(♦) | Shaft front | Semi-open (f_mode=0.5) | Send face 2 only |
Face 3(*) | Knob | Semi-open (f_mode=0.5) | Send face 3 only |
Face 4(♦) | Shaft front | Closed (f_mode=1) | Send face 4 only |
Face 5(*) | Knob | Closed (f_mode=1) | Send face 5 only |
Face 6 | (Reserved for thumbnail) | Send data from all faces | |
Face 7 | (Reserved for applier decoration) | ☰ Menu (certain clicked area) |
($) Face
0is the only face used by theBlenderapplier as it has a limited surface area.
(*) Faces
0,1,3and5can use identical textures.
They remain separate to allow individual customization if needed.
(♦) Faces
2and4can use identical textures.
They remain separate to allow individual customization if needed.
During development the creator of the applier is able to click faces
0-5(individual data application) or face6to bring up the menu similar to what end users will see.
The ‘Apply’ button will initiate the transfer of all current readings from all the faces.
The ‘Remove’ button sends a request to make this layer invisible, removing it from the Device.
We are developing an updated version of the applier that allows for more granular control of which parameters should be sent.
For quick application of similar settings, instead of Shift-clicking faces
0-5, you can select the whole applier. Any changes made to the rest of the applier mesh will be restored to their default state, leaving only faces0-5with the applied settings.
Finalizing Applier
Follow these steps to finalize your applier to make it safe to send as a gift or to sell it:
- Take a copy of the applier before finalizing it to have it as backup.
- For the
Fluidsapplier only:- Mark just one fluid type as part of the final applier by assigning
SKIP (special texture)as the Diffuse texture to the rest of the fluid faces; otherwise the applier will affect multiple fluid types (unless that is your intent).
- Mark just one fluid type as part of the final applier by assigning
- Drop the
Ck-OBS / DEV / applier / readyscript into the applier.
This automatically:- Removes the
Ck-OBS / DEV / applier / devscript. - Saves all the data off the applier surfaces into LSD3.
- Removes all the textures or PBR materials off the faces
0-5. - Replaces the applier’s background face (
7) with a different texture suitable for selling.
- Removes the
- Once the above is done, all the applier’s faces become static and can be modified for the brand’s look & feel.
- Make sure to rename the prim.
Never use the word
aerosas the first word in the name. - Add a thumbnail to face
6, and change background face7to match your brand style. The whole applier is made clickable to bring up the dialog with ‘Apply’ and ‘Remove’ buttons. The ‘Remove’ button acts in a similar way to the ‘Remove’ button in the Customization HUD. - Change the permissions of the mesh and scripts.
- Add a note for your end users that, in order to adjust the tint or alpha, they will need to use the Customization HUD, although they will not see the custom texture there.
Footnotes
-
The Blender layer is a ring around the base that sits above the Skin, Tattoo, and FX layers and can be used to create specific blending with the body. ↩ ↩2 ↩3 ↩4
-
TFB — abbreviation for Tattoo, FX, and Blender layers just to make the subheading more concise. ↩ ↩2 ↩3 ↩4 ↩5 ↩6
-
LSD — abbreviation for Linkset Data. ↩